
This is a feature that allows you to work on a markup offline in Excel. The original idea of this feature was a response to the need for ‘airplane mode’ – a way for you to work on a markup when not connected to the internet. The idea is that you export a markup from Edelweiss, work on the Excel file to add or modify notes, tags, priorities, and suggestions, then when you are back online, re-import the same Excel file into Edelweiss to update your markup. This is still the primary use for this feature, but it has enabled a few other ‘tricks’ as well.
For example:
* You can share these Excel files with other reps, and they can import your notes. A word of caution: if you do import another rep’s notes, tags, or priorities, they will override any notes, tags, or priorities you already have set for that markup, unless you have “Add Markup Note from file to existing Markup Note instead of overwriting” marked off. So if you do NOT want to override your current values, create a new markup before importing. Also, you can use the ‘share’ mechanism instead to share markups directly with your colleagues, which might be more efficient.
* You can make suggestions for one account, and import the same numbers as suggestions for another account.
* You can annotate one catalog, and import your notes into another catalog – or collection – that includes some of the same titles.
* If you want to quickly apply the same value (e.g., ‘Skip’ for priority) to a large number of titles, you can do so in Excel and re-import to your markup.
* You can actually import data to your markup from an entirely different source if you first format it into the right Excel format. See below for formatting details.
* Some reps use this as an offline order form. The exported file exports all titles listed in the catalog or collection, and if you have selected a store name at the top of the page before exporting, your specific order suggestions and any store’s order quantities on open orders will be exported too. If need be, you can save this file and even print it if you’d like, and mark this spreadsheet as an order form… if you have no internet connection or just want a place to key in an order rather than only a suggestion. (Note that order quantities cannot be imported. This is just a way to generate a form.)

To start, click on the Export icon at the bottom of the catalog page. An Excel page will load with the ISBN and description for each title in the given catalog along with a column for each editable field in a mark up. You can edit some annotations directly in this Excel document.
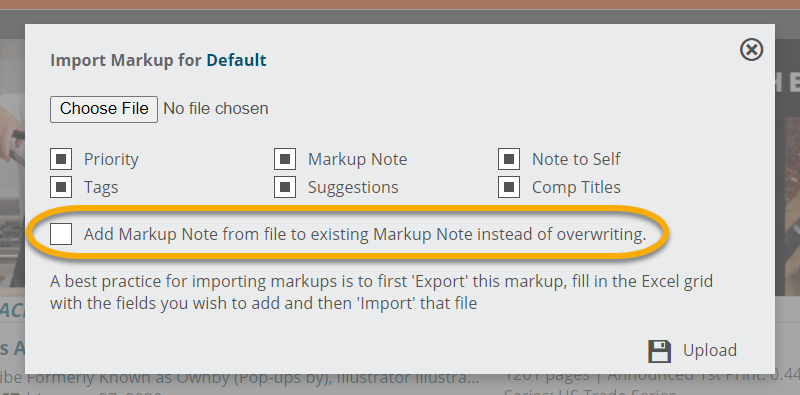
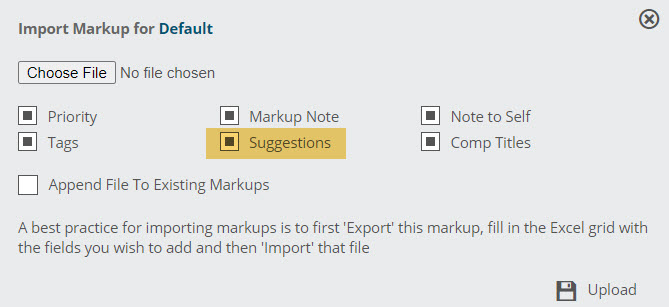
Once you’ve made your changes and saved the spreadsheet to your computer, or if another rep has sent you their markup file to use, click the Import option to import the markups back into the system. You’ll be offered checkboxes to indicate which elements you’d like to import: markup notes, priorities, suggestions, or tags. Remember to check at least one of those boxes. Edelweiss will display a confirmation message when the file has been imported successfully, and then will refresh the page to show the updates you’ve imported.
If you’d like to simply add to your existing Markup Notes, you can use the Add Markup Note from file to existing Markup Note instead of overwriting (shown below) tool. With this option, the text included in a file will simply be added to your markup notes rather than completely overwriting any existing notes. Note that this option currently only impacts markup notes — tags, personal notes, and other markup elements cannot be appended using this method. More on using this feature here!
There are a few things to bear in mind about the general markup import process.
Key fields that can be edited to have a bearing on what imports are Priority, Markup Note, Tags, Note to Self, Suggestions, and Comp Titles. All other fields are for your reference only, and even if the contents are deleted or changed, there will be no impact on what is imported.
Column Names: You must keep the names of the header columns since this is how Edelweiss knows which fields are which.
Sorting: You can also re-sort the titles in Excel (just don’t include the headers when you sort to make sure they stay at the top).
Skipping some titles: If you like, you can remove rows from the Excel file completely if there are titles in your markups you don’t want to update with the data in the spreadsheet – for example, if the spreadsheet came from a colleague and you want to protect some titles in your markup from being updated at all, but allow others to be updated, you could remove the rows with the items you don’t want to update.
Editing Guidelines
ISBN: The ISBN’s should not be changed as they are the reference key that allows the import to work properly.
Priority: You can adjust the priority here – if this field is left blank, the priority will import as “Not Set.” Otherwise, the contents must be set to one of the following: High, Featured, Highlighted or Low.
Markup Note: You can edit or add notes here and they will be imported into the markup if you check the box for ‘Markup Note’ as you import. The maximum length for a note is 5000 characters in Edelweiss. Keep in mind that the note in your Excel file will always override any existing note for the same title in the markup you are importing to unless you have the option “Add Markup Note from file to existing Markup Note instead of overwriting” marked off. Even if your note is blank in the Excel file.
Tags: Tags you’ve already made will be exported and you can add new tags to titles here, as well. If you are including more than one tag in your Excel file for the same title, separate them with commas to ensure that they are imported as separate tags.
Area: This is the store name and needs to stay the same to import successfully. If, however, you want to copy existing suggested orders and upload them for another store, you’ll want to make sure this column is there, but blank like so:
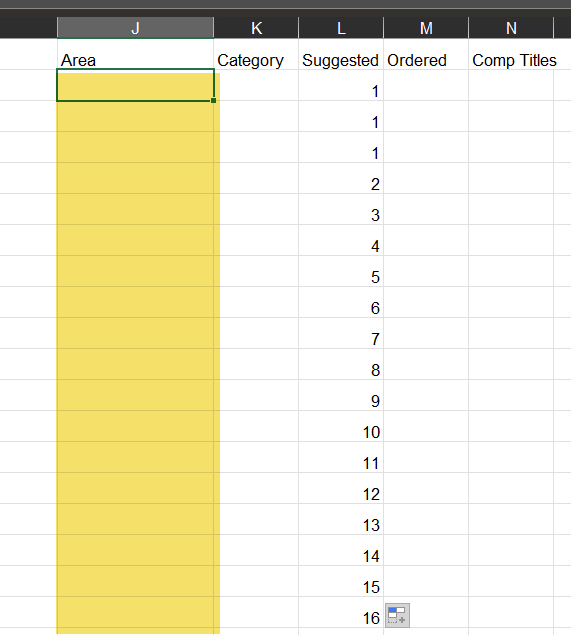
Suggested: This is your suggested order quantity. You can enter suggestions here, and they will be imported when you import the Excel file back into Edelweiss – assuming you first select the destination account from the View Account Detail dropdown. **Note that if you want to import Suggested Orders for a different account, you’ll want to delete entries in the “AREA” column in your Excel file to clear it out. You can also import just the Suggestions by un-marking the boxes next to everything except Suggestions upon import.
Other Fields
Title: Titles are there for your reference – edits will not change the markup when imported
Imprint: The imprint column is mostly there to help you quickly find those titles belonging to specific imprints while working in your excel file.
Category: This is the POS category that the store applied to this item if they ordered it.
Ordered: If the account has already assigned orders, those numbers will be here. Any edits you make here will NOT be imported into your mailing since only the accounts can edit their actual order quantity. These are simply for your reference. Exporting a mailing to Excel in this way is also a way for you to retrieve orders that your account entered, to enter into your own system. However, it is probably more effective to export the orders itself. There is more about exporting actual orders in this help area.
Comparable: The export process will export all Highlighted comparable titles. See details about comparable titles and how to highlight them here.
Other Things to Note
Export/Import is Markup-specific: The updates will apply to whichever markup you have selected at the bottom of the page in the list view. You can still create a new markup that includes none of these notes or create a new markup for the catalog that copies over all of the notes from the first markup. If you have not created a markup, it will import into the markup called “Default.” Also note that this process will look at the ISBN’s in the file, and only add elements to your markup to matching ISBN’s. It will not add new titles to a markup. And, if you import a markup into a catalog other than the one it came from originally, it will just match by ISBN – for example, you could use a markup from an imprint-specific catalog, and import it into a ‘combined’ or ‘Omni’ catalog that contains the same titles. Only the titles in the spreadsheet will update your markup.
Make a backup if unsure: If you are importing another rep’s markup and are concerned about overriding your own data, you can first Export your markup to your own Excel file. In the worst-case scenario, you can always re-import your Excel file to set the markup back to the way you had it originally.
Transferring notes or tags to other catalogs: You can transfer markup elements from one catalog markup to another catalog with some of the same titles. For example, if your company uses both imprint and large compilation catalogs, you can create a markup in the imprint catalog, and then import it to the large compilation, thus allowing you to replicate the same notes to the matching titles in your imprint catalog markup. Or vice-versa, of course.
Note that your original exported file might contain much fewer or many more titles than the catalog markup you are importing into, and that is fine. The import process will only update items that match (by ISBN) the items in your importing file and won’t add or remove any titles from the markup.
Also, note that there is no need to transfer order suggestions this way for the same store – your suggestions for a specific store stick to the book, and not to the catalog or markup. If you suggest a quantity in one catalog, the viewer will see the same suggestion for that title regardless of the catalog they are viewing.
