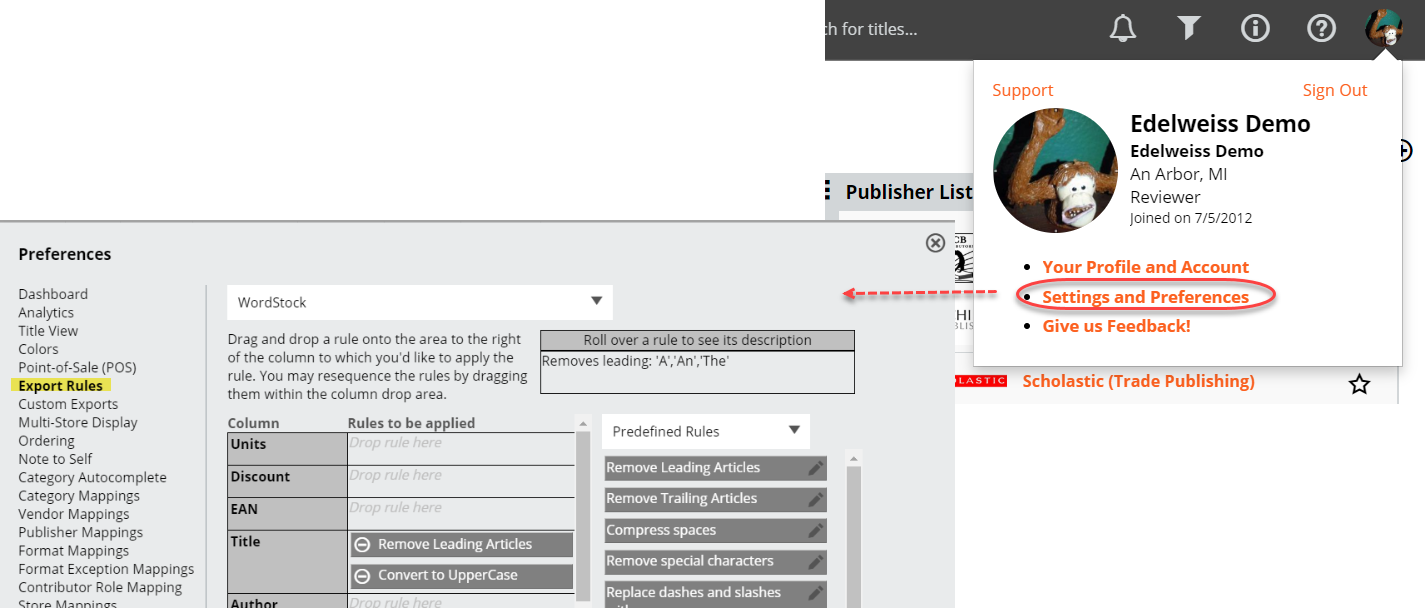
Export Rules may be applied to any export format to remove leading articles or punctuation, make abbreviations, and further customize your data in preparation of importing it into your merchandising system. Instead of applying these rules to an individual title in individual orders, they can be applied to the entire export format – usually, this will be a POS format such as Booklog, IBID, etc., but rules can be applied to custom export formats, as well. This is a way to format text in the way that you prefer or to conform to conventions in a POS or other system.
To get to the Export Rules, click on the Preferences Icon and select Export Rules.
Select the Export format/type that you want to apply rules to at the top of the page. You can pick from the list of Predefined Rules in the upper part of your screen on the right. These include common rules, such as “Remove Leading Articles” or “Abbreviate Author Name”, which replaces the author’s first name with just their first initial. When you hover over the name of the rule, a slightly longer text description of that rule appears in a box on the right. Use your mouse to drag a rule to the field you want to apply it to, such as Title or Author.
A couple of other noteworthy rules to call out are the blank column rule that allows you to erase all text that appears in a certain field of your order export, e.g. Buyer Notes, so that text doesn’t get transferred into your POS system. Another rule allows you to pre-pend your Title field with “CAL-” if you need to apply a unique title convention to a category of products, as in this case, with calendars.
If you don’t see a specific rule you need, you can create your own within the Your Custom Rules section. Each of these rules may have several pairs of things to find and replace. For example: replace “ AND ” with “&” or “Field Guide To” with “FGT.” Remember to include spaces before and after any word you intend to replace with a number or symbol: for example, you don’t want “bone” to become “b1″!
To create your own custom rule, click on the New button. A Manage Rule Group window will appear. Enter a Rule Group Name, which is what is displayed within the Your Custom Rules box on the previous screen. Enter a brief explanation of what action is taken within the Description box; this will appear in the Description box on the right of the main Export Rules screen when you hover over the Rule Group Name.
Then enter your action or the word/phrase to be replaced and the text that it will be replaced with. Here’s a fairly common example, which will replace all instances of the conjunction ‘and’ — note the spaces around the word — with an &:
If you’d like to add a related rule under the umbrella of this Rule Group, select the Add Row option to create a new blank row/rule. When you’re finished, click Save and Close the window.
A special note about copying Edelweiss’s pre-defined Prepend Cal- export rule to create your own annual edition of it: Don’t include the quotation marks in your actual rule, and do answer Yes for RegEx?, which stands for Regular Expressions. So this is what your version of this rule would look like:
Creating a Rule to make a Default Value
If you are using a POS system where there are extra POS-specific fields that would otherwise be blank (such as Book Class or Type for Square One users, or DEPT for IRT users) you can make a rule that will populate these with a default value if there needs to be something in there for import. You can still override this value for individual titles as you order through the “Edit <POS sys> Attributes” editor, or in the export preview screen. For example, you may want Book Class to be always set to ‘Books’ by default instead of being blank.
Create a rule as described above, and leave Find the word/phrase blank, and put your default value (Books) on the Replace with side, like this:
If you want your new value to replace all current values in a particular field, as well as blank values, enter ^.* in the Find the word/phrase field and check the RegEx? box. So in this scenario below, if you apply this Calendar Regex rule to your Store Category field, the new Store Category values that will appear for all items in the next order you open in Export Preview mode will be set to 78000:


