
Initial One-Time Steps
- If you have not already done so, please contact WordStock to get the necessary software installed. Check here for more information or contact Wordstock’s Dan McCamley at 800-753-9673.
- While you’re working with Wordstock Support to get your Edelweiss module installed, be sure to let them know if you plan to use your Edelweiss vendor codes, rather than Wordstock vendor codes derived from the ISBN prefixes. They may need to make a minor configuration change so that the right vendor codes are used.
- In Edelweiss, click on the Preferences Icon, and then click Point-of-Sale (POS), and select Wordstock
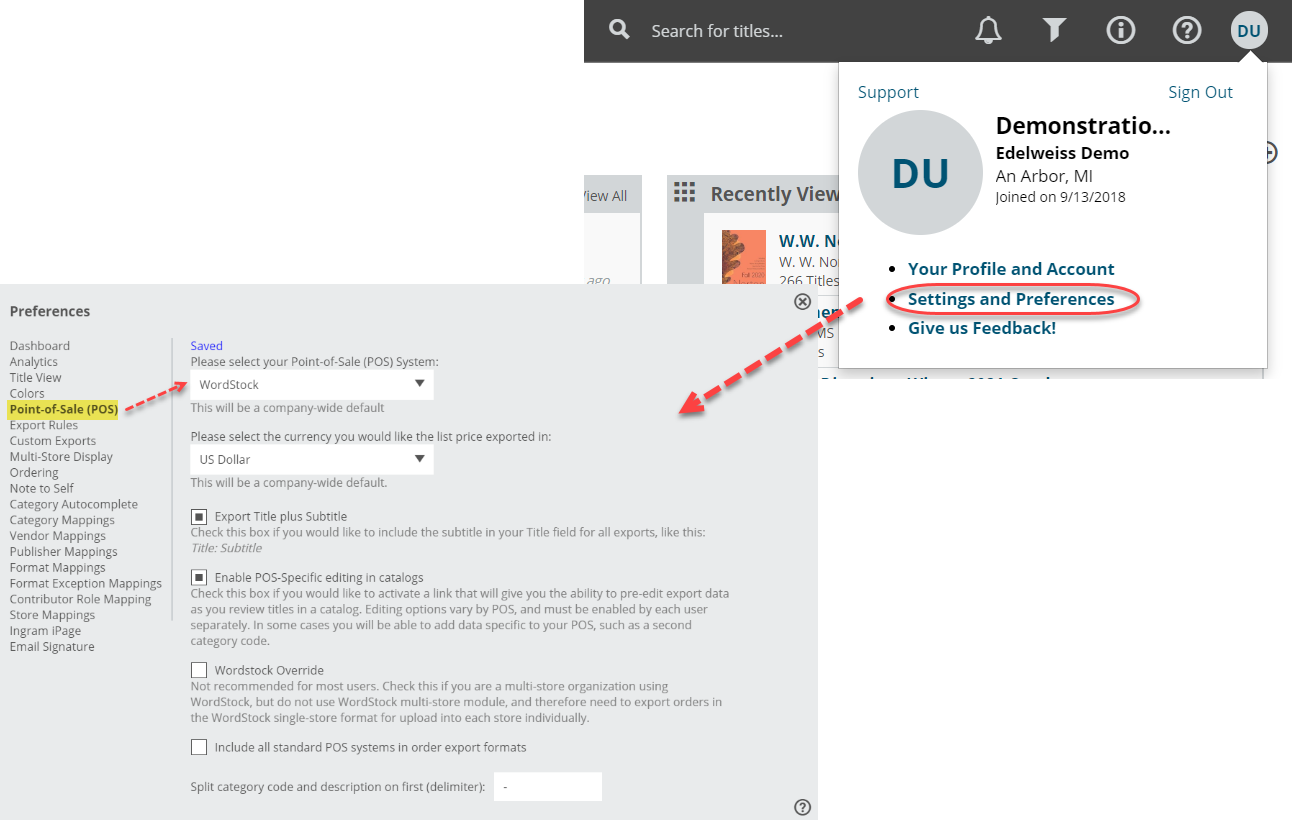
- Then, on the same admin screen, click on If you are part of an organization with more than one store, you will see a list of store names here. You should see either a list of stores or just your store here. (Note: if you do not see multiple stores listed here, and you should, please contact us at support@abovethetreeline.com and we’ll get you set up.) Details about Multi-store ordering here.
- The Export Value here must be set to a number to create the correct information in your WordStock order files. If you are a single store, most likely the store number WordStock expects is “1.” If you are using the multi-store WordStock system, make sure to enter the store numbers that WordStock would expect. Initially, the default for Export Value will be a code such as “XYZ1.” The description field here is for your reference only and does not need to be filled in.

When an order is ready, go to your Orders page, and click into the Export Preview screen for the order you wish to export.

To view your order in the Standard View, which shows your order in a catalog format, so with all the title covers, catalog copy, bibliographic information, etc. just click on the order name. This can be a useful view when editing titles’ category codes, etc. While in that view, enter your Export Preview screen here:

In that Export Preview screen, click Download to export your order:

Edit your order as needed. Details about doing so here.
Then click that FTP button.
The following information has been provided by Wordstock to help with importing your orders on that end. For questions about the process of importing orders into Wordstock, you’ll want to contact Wordstock support.
Click here to read or print a PDF document from WordStock about how to use the import interface once you have exported an order or inventory from Edelweiss. For multi-store import instructions, please contact Wordstock.
Ordering
- Create an order in Edelweiss. For more information on how to use Edelweiss, please refer to other articles in this help area.
- Make sure that you either assign, or override suggested section codes as you work on a catalog (a note about mapping categories here). Note that what Edelweiss refers to as Category in an order or in mapping corresponds to Section1 in Wordstock. See more about categories and section codes later in this document.
- When you have added the items you want to your order, go to the Orders page in Edelweiss.
Export Preview
Click into the Export View for your order. The purpose of this screen is to give you an idea of what will end up in WordStock, and give you an opportunity to edit some fields to make sure the data complies with the WordStock import.
You may notice that there is a system of red and blue color-coding to indicate areas that need to be changed. If you don’t see any color-coding though, it’s because there are no changes needed. The cells for any missing data that is required will be shaded blue; values that are not numeric-only, when they should be, are in red font. The reason for this is to help you get all the correct codes and numbers that WordStock will expect when importing your order. This color-coding is purely a warning; it won’t prevent you from downloading the order. However, you will encounter errors when attempting to load orders with incomplete or incorrectly formatted values into WordStock.
There are most likely a few things to address before you can export the order. The messages at the top of the screen, in red, if there are any, will indicate which items need to be addressed and will disappear as you address them until there are no more messages and the whole page is black and white.
Changing General Order Information
Click on the Edit Order link. Here you may need to add or change these three things if you did not set them when you created the order originally.
PO Number: there must be a PO number assigned (if this is to be an order), and it must be a number
Order Discount: for cost prices to come through in WordStock, you should assign a discount percentage. The format is just a number, without a percent sign (for example 44)
Vendor Code: there must be a numeric WordStock vendor code associated with your order for it to import into WordStock properly. (If this is designated to be an order)
Note: if you intend to import simply to add those inventory/title records to your system, this step is NOT necessary.
Category/ Section Codes
The column headed Store Category on the export preview screen shows you what will wind up in the Section 1 field in WordStock.
These are the codes that you typed as you added titles to the original order. Or, if you utilize the category mapping feature in the admin section, it will suggest categories for you. Any suggested categories can be overridden either on this screen or as you add titles to the order. WordStock requires that the Section 1 code exists for each item for a successful import, and is a number. If there are missing codes, the whole box will be shaded blue. If there are non-numeric Section 1 codes, they will be indicated in red text.
To add missing categories, you can either go back to the order in the context of the catalog information or change it with the Edit button to the left of this title on here on the Export Preview screen. To go back to the order with the full view of the catalog content, click HOME at the top of the page, and then click on the number of titles (#titles) for that order. Or you can back to the original catalog mailing if you prefer, but this will show you only the ordered titles.
You will notice on the Export Preview screen there is a field for Secondary Store Category. This will translate to Section 2 in WordStock. For now, the only place to edit that field is here on the export preview screen, so one tip is that you may want to type in the secondary section code after the first code in the Add Category field when you’re marking up a catalog. So if section 1 is “123,” and you want section 2 to be “456,” type 123/456 in the Add Category field. Then when reviewing the order on the Export Preview screen, move “456” over to the Category 2 field in the Edit box.
If you use the Edit method directly from this screen, you may want to also set a new format, vendor, and possibly publisher at the same time. (See below for details).
Format/ Product Codes
The field labeled Format on the Export Preview screen will end up being the Product Code field in WordStock. Product Codes do need to be numeric for WordStock, so you will see red text here if you have not already mapped Formats in Edelweiss. Mapping in Edelweiss can happen ‘on the fly’ when you edit a title here, or you can click on the Field Mapping link (which is a shortcut to the admin page) and select Formats. Here you can set your preferred codes for all the possible Edelweiss formats, or at least the most common ones which should take care of the red text here. Of, as a bit of a shortcut, you can click on Edit next to this title, and then key in the correct WordStock product code for this item in the Format field. When you click save, or the green arrow to go to the next title (which automatically saves) you will be prompted to see whether you want to apply this code as a permanent mapping. Most of the time you would say OK to this prompt. It means that all the other items on your order, and future orders, will automatically have this code for items with this type of binding or format. You can always change it later if need be, either this way or directly in the Format mapping table in Admin/Field Mappings.
Vendor Code here is what ends up in Vendor# in WordStock. The exact same things apply to vendor codes as format codes. Note that if you encounter any vendor code change issues when you import your order, e.g. where the vendor code ends up being updated to something other than what appeared in your Edelweiss order, it’s probably because you have a WordStock option set to derive the vendor # from the ISBN. WordStock Support will be able to help you turn this off and use the vendor # on your Edelweiss order.
Publishers/Imprints
The ‘publisher code‘ field on the Export Preview screen shows the value that will end up in the Imprint field for this item in WordStock. It does not need to be numeric, and the default here will usually be an Edelweiss numeric code (in a later version this value will actually be an imprint name by default). You can map publishers the same was as vendor code or format – either by going to the field mappings list or as you edit information on this screen.
Discount
In addition to the discount field in the general order information, you can set a discount at the line item. The main discount will be applied to the price as a default, but if there are items where a different discount should apply, you can edit it here through the Edit feature. This is not a required field, so unless there is an item with a discount that is the exception to the main discount you applied to the order, there is no need to edit this field.
This might seem like a lot the first time, but as you apply mappings this process will become a lot easier. Make sure that you have eliminated all the colors, and scroll to the right to check that the store ID field is not red.
Notes on some other fields in the export preview screen:
Units: the first field is your order quantity and will end up on the PO assuming this is a PO export.
Title: Note that you can set custom export rules to change title formatting, abbreviations, etc. Note that leading articles are removed by default in the WordStock export format
Author: Note that you can set custom export rules to change author formatting
Buyer Notes: These are the “notes” that buyers and other users at the store can mark on a title. They will end up in the Comments field in WordStock. Note that if you prefer not to import your Edelweiss notes to Wordstock, you can add an export rule that can do that for you. Please contact us for help if you’d like to set that up.
The following fields display here but are not yet active in the WordStock import process, so are essentially placeholders for now. When they are active, we can make changes to Edelweiss to populate them or to allow you edit these fields too: Lookup; NewIndicator; FRP; FRQ; Catalog#
Check the box marked FTP on the Export Preview screen
Click the Download button.
This will create an order file on FTP server at Above the Treeline, and during the install of the new software on your WordStock system, it will have been configured to check this folder for new files, and download them as they are found.
Inventory Only
This checkbox will let you export a file that is intended to only set these titles up in WordStock, without also creating an order. When this is checked, the red messages and color coding should change to some degree since some fields are not necessary – such as PO number and PO vendor code.
To export to inventory only, you can do one of two things.
- Create an order, and mark items as having 0 for the order quantity. This will put them on the order without you seeing an order quantity in Edelweiss so that you can then export this ‘order’ as inventory only.
- You can export directly from a catalog by going to Actions/Export. This will export all the items you have checked on that page (not that you can ‘check all’ items on the page with a single checkbox at the top of the list view of titles, and you can show up to 100 titles per page). In this case, however, you will not be presented with the Export Preview screen to check that all the data is correct, so you must have mapped bindings, vendors, and applied WordStock section codes to all titles to create an error-free file.
Click here to read or print a PDF document from WordStock about how to use the import interface once you have exported an order or inventory from Edelweiss. For Multi-store instructions, please contact Wordstock.