All publishers classify their titles using industry-standard BISAC codes. You’ll see these codes listed in Edelweiss here:
When you filter by subject and/or genre, it is these publisher-generated classifications that are used for those filters. Your store may or may not have a Literary Fiction section, or you may place literary fiction in a General Fiction section on your shelves. Each store is different, which is completely fine. You can add whatever section code you like to the titles you buy for your store. This is generally a crucial step before exporting your order to your POS system. Details about adding categories here.
So, you can manually add category codes to each title you buy, or you can MAP your categories. This is basically just the simple process of saying “When I buy, say, a mystery title, automatically tie my store’s Point-of-Sale system’s mystery section code to that title.” So if all mystery titles are classified as, for example, MYST in your POS system, you can make that just happen automatically. Travel guides automatically mapped to your store’s travel sections, etc. It takes a bit of a time investment upfront but tends to save a ton of time later on. Plus, you can always edit the category for a specific title.
Here’s how:
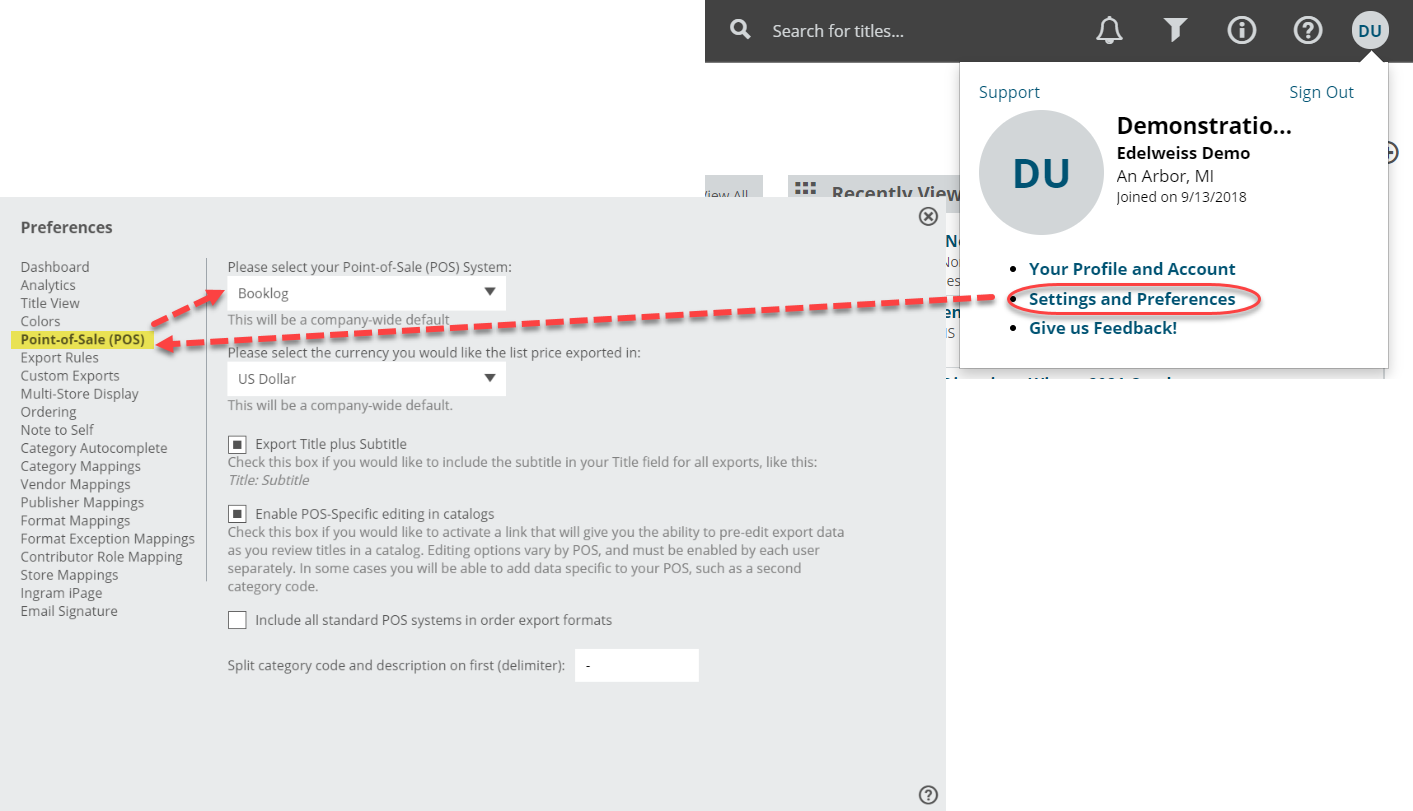
The very first step is to select your Default POS system. Any mapping that you do will be connected to that default. Click on your initials or profile picture in the top-right of your screen and select Settings and Preferences. Click in Point-of-Sale (POS) and select your POS.
Next, click into Category Mappings in that same Preferences screen. You’ll see a list of BISAC categories with some entry fields:
To clarify what you’re seeing here, the Description is the list of publisher BISAC categories. The E+ Code is just a placeholder code, and whatever you enter into the Export Value field is what will be exported in your orders. The Description field you can type in is where you can, if you like, include your store’s section name. The only absolutely necessary field here is the Export Value.
So, for Cooking, for example, you would add whatever code you use for those sorts of books in your store. Whether it’s a numeric code, an abbreviation, etc.
Once you’ve mapped a category like this, when you see a Cooking title anywhere in Edelweiss, your store’s “Cooking” section code (C123 in this example) will be automatically applied.
The lightning bolt icon indicates that the category code you see is the result of your Category Mappings. If you edit that category code, the lightning bolt icon will disappear, indicating that it’s been updated.
There are these “Top Level” BISAC categories that you initially see, but there are also those categories’ sub-categories. For example, there is Cooking, but you can click through and see all the different possible ‘genres’ of cookbooks as well. Your store might just have one simple Cookbook section, or you may split them up according to, for example, international, barbecue, beverages, gluten-free, etc. You can still map those sub-categories by clicking in the menu shown below to expand each BISAC category:
Fiction is a pretty easy one to use as an example, so we’ll do that here. Fiction sections in stores often consist of multiple sections, like Fiction, Mystery, Sci-Fi/Fantasy, etc. You’d probably want MOST titles to go right into your Fiction section. So you’d map that top-level category to your store’s fiction code. In the genre area, you have the opportunity to override that top-level code with your genre codes. So here, you only need to map those categories that you want to classify as something besides your general fiction code.
So this store puts Erotica, Fairy Tales, and Family Life genres all into their General fiction section. They do have a separate Science Fiction/Fantasy section and so they’ll map those categories accordingly. So titles with a BISAC category of Fiction/Family Life will be automatically classified as FIC, and titles with a BISAC category of Fiction/Fantasy will be classified as SCIF at this store.
Since those genres are often all grouped together in the list, it can be quicker to use the Selection tools at the top of the list. There are checkboxes next to each category, so you can check those boxes and then click on “Fill Selection” to add a category code to all of those selected categories at once.
You can Select All, Unselect All, Invert Selection (this one will unselect what you’ve check-marked and select everything else on the page), as well as Clear Selection, which will delete the export fields for all selected categories. These are all available in the interest of making this process go as quickly as possible. To make sure it doesn’t take TWICE as long, be sure to SAVE YOUR CHANGES!
If you find that you end up “correcting” your mappings quite a bit (editing what shows up while doing your orders) you can always come back into this tool and edit your mappings to better reflect your store.


