
The Custom Exports feature lets you build your own report template for downloading order files from Edelweiss. If you use a POS system for which we don’t offer a pre-formatted export, this could be your first step to downloading your Edelweiss order and importing into your system. Or perhaps you simply would like to save and/or print your own customized version of a title list.
To get started, click on your profile picture or initials at the top of your page to get to the Settings and Preferences. Select Custom Exports.
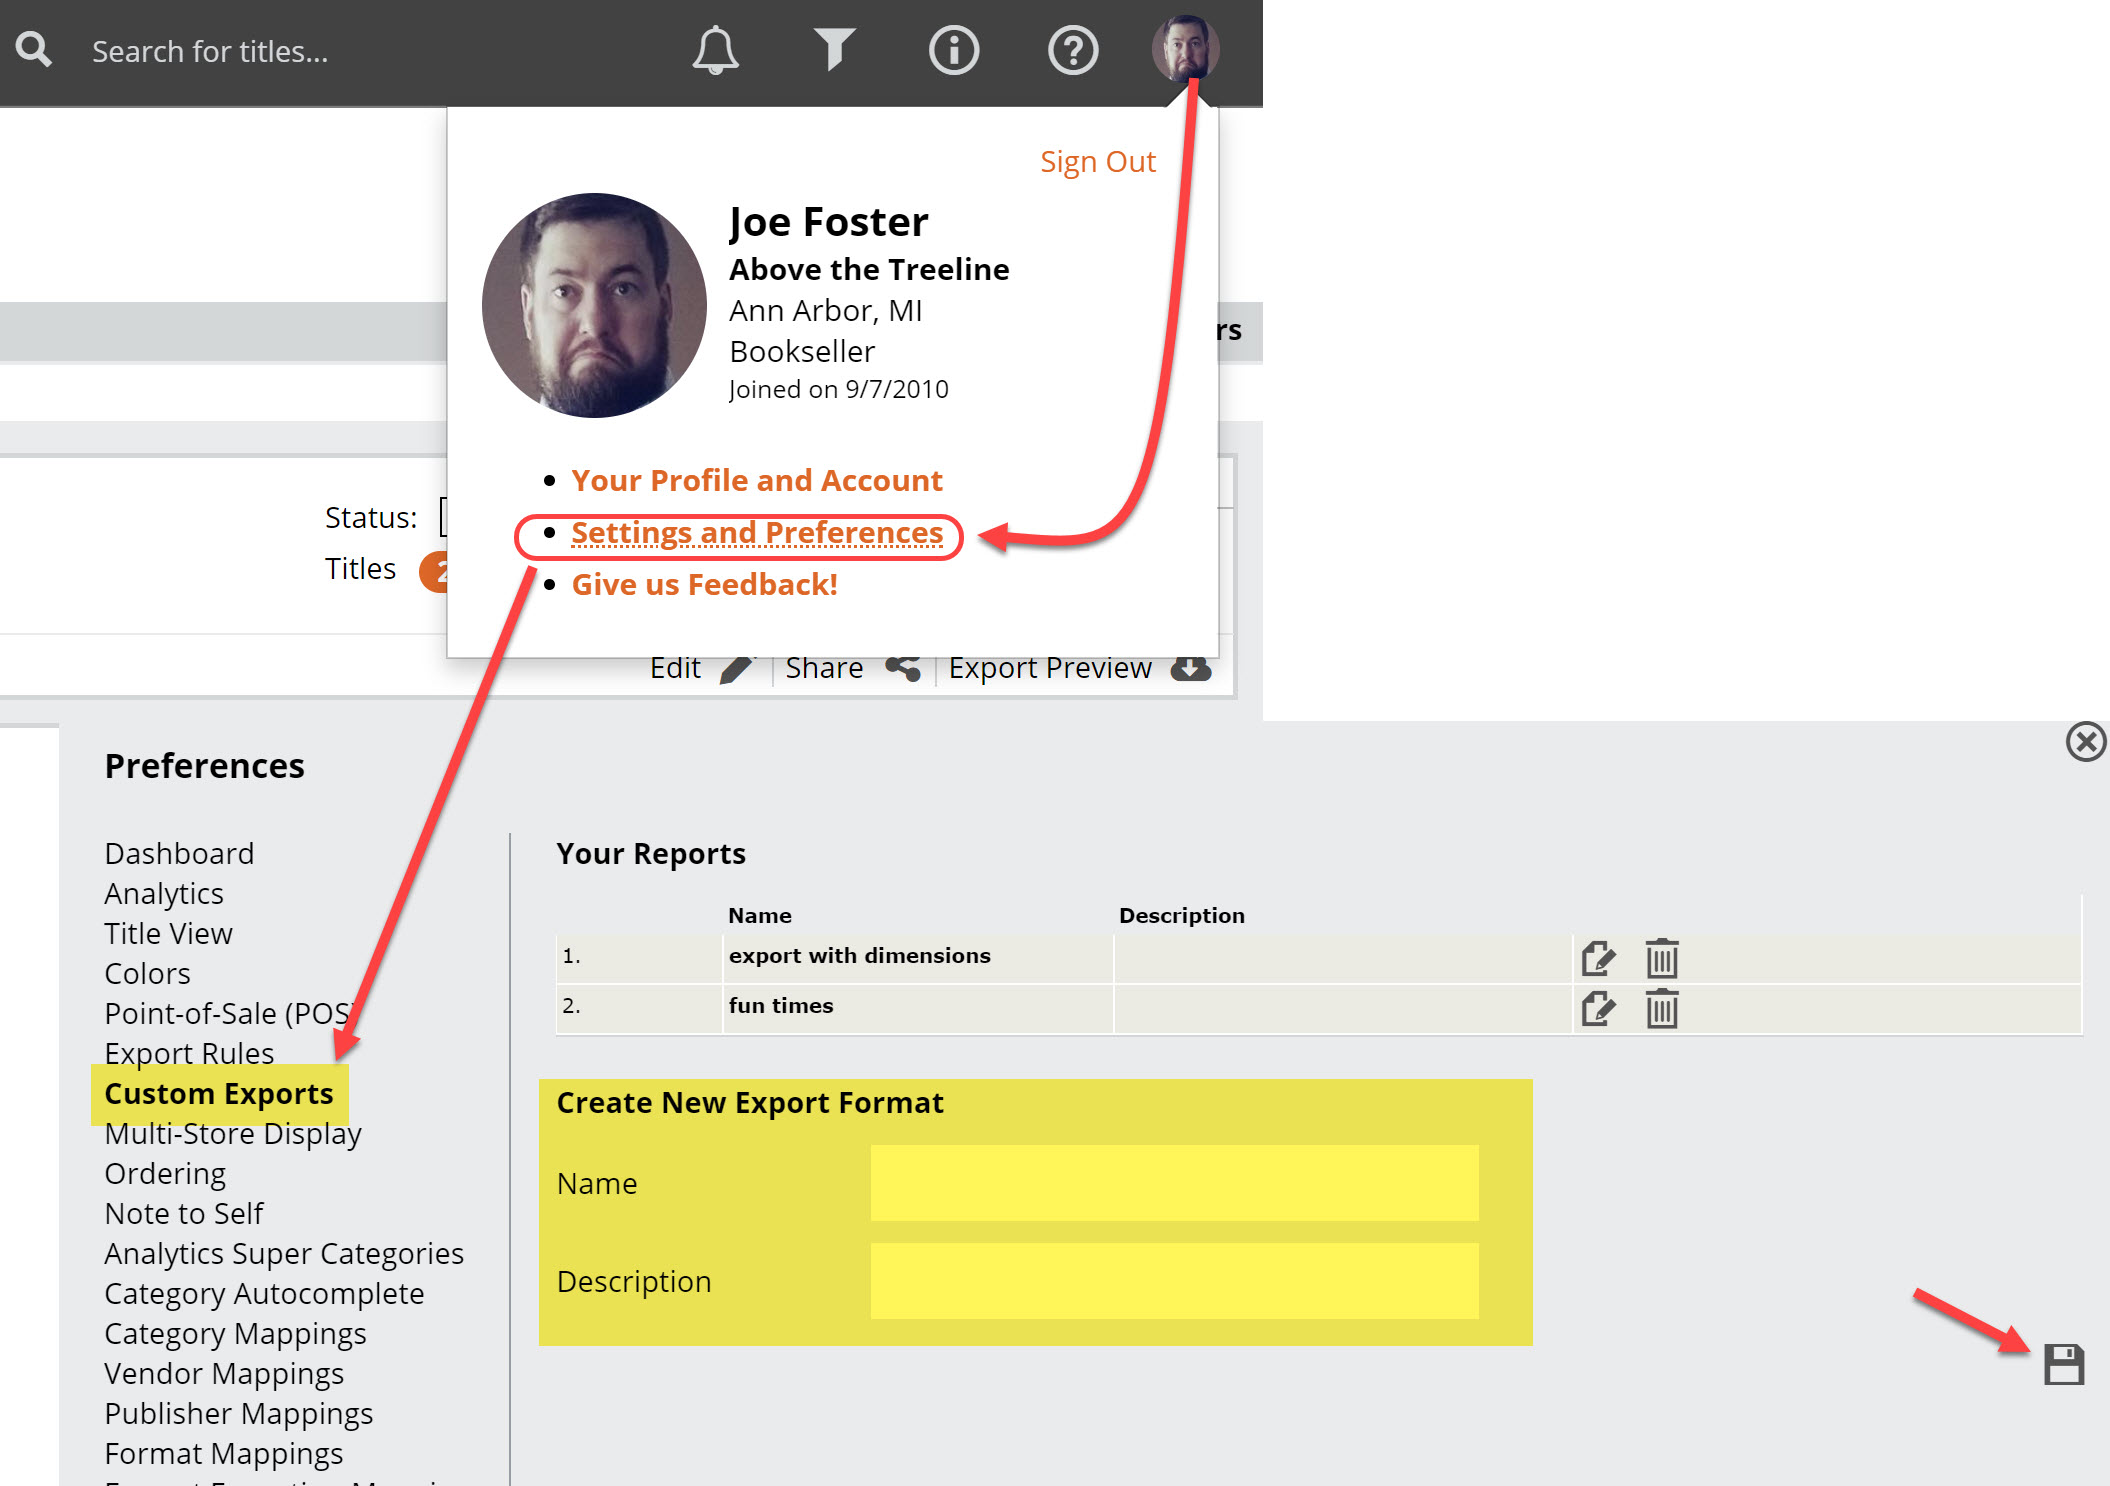
Type a name and description for your file template, and click the save icon.
You’ll see your new format listed on the screen and can click into this in order to edit the format.

You’ll now see a screen where you can customize your report.
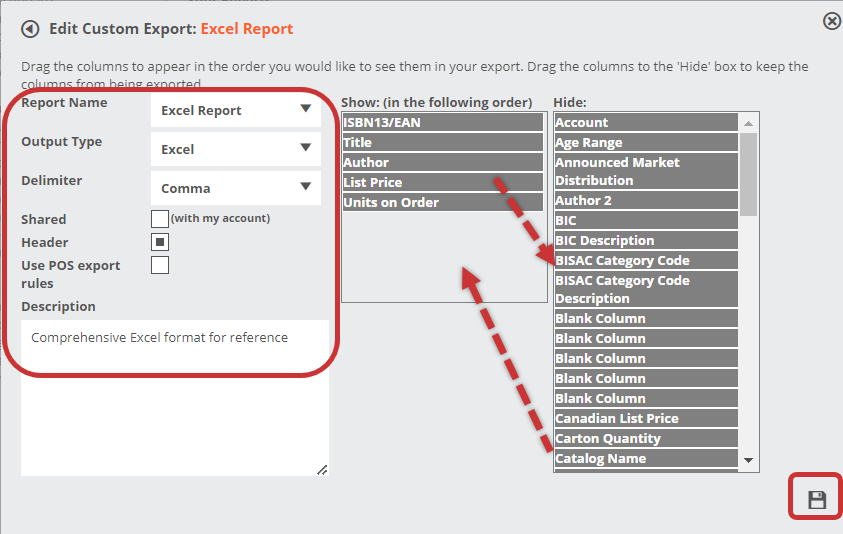
ReportType: Select Text or Excel here. If you are creating a report to email to someone, print, or edit yourself, Excel is the best option here.
Delimiter: If you selected Text as your report type, you will have the further option to set a delimiter. A delimiter is a character that will distinguish one field from the next so that when it is imported into another program it can separate the fields. The options are comma, pipe (which is one of these lines | ), and tab character.
Shared: If you check this box, other Edelweiss users at your organization will have access to use (but not edit) your format. If others in your organization could find your new format useful, this is a way to save them from creating the same custom format separately. If you are not sure, you can come back here and change this later.
Header: This box is checked by default. It means your file will have the field name as a header at the top of each column. For importing into other systems, it’s sometimes better to have no header. But for viewing or printing in Excel, it is usually helpful to see them.
Selecting fields: To select fields to export, you will need to drag and drop the names of the data elements you want to see from the Hide box to the Show box. By default, you will see that the Show box will include the ISBN13/EAN and a few other key data elements already. Drag other fields over to the Show box, and arrange them in the order you want them to appear in your exported file. Note: the drag and drop action on this screen is a bit touchy, so you may need to drop a column header towards the top of the contents in the Show box and then rearrange the headers once you’ve got them all there.
Most of the column headers you’ve got to choose from are self-explanatory, but there are a couple that warrant a brief note:
- BIC is the title’s BIC (Book Industry Communication) subject code, as provided by the publisher
- BIC Description is the title’s BIC (Book Industry Communication) subject description, as provided by the publisher
- BISAC Category Code is the title’s BISAC (Book Industry Standards and Communications) subject code, as provided by the publisher
- BISAC Category Code Description is the title’s BISAC (Book Industry Standards and Communications) subject description, as provided by the publisher
- Catalog Sequence is the original numerical placement of the title in its Edelweiss catalog. If you include this in your export format, it gives you a way to re-sort the order later in Excel if you want to review the order in catalog sequence. Currently, orders will be exported in the sequence that corresponds to how the buyer entered the order, which may not be in catalog order. If the order contains items from several different catalogs, and you want to sort things in Excel into the original catalog orders within each catalog, then include export Catalog Name to use for sorting as well.
- CLIL is the title’s CLIL (Content and Language Integrated Learning) code, as provided by the publisher
- CLIL Description is the title’s CLIL (Content and Language Integrated Learning) description, as provided by the publisher
- Format Code is the title’s format code, as provided by the publisher
- Format Description is the title’s format description, ie. Hardcover, Trade Paperback, Mass market, etc.
- PO Number is only relevant for retail or library buyers, and is the Purchase Order number assigned to the order. Note, on PO Numbers will only pull when you export using the Export Preview function on an order, and will not pull from a standard catalog export
- Product Link will show the title’s Edelweiss URL
- Publisher Code is the publisher or imprint code
- Publisher Name is the publisher or imprint name as provided by the publisher
- Vendor Code is the distributing publisher code
- Store Category reflects the library’s own section/subject designation. Learn how to add or edit your category and collection codes in Edelweiss here
- Store ID reflects the library’s Edelweiss internal ID code which is probably only meaningful for Treeline client libraries. You may want to include Store Name instead.
- Thema is the title’s Thema code, as provided by the publisher
- Thema Description is the title’s Thema description, as provided by the publisher
- Units on Order is only relevant for retail or library buyers, and is the quantity you have on order. Note, on order quantities will only pull when you export using the Export Preview function on an order, and will not pull from a standard catalog export
**Quick note, some title attributes, such as summary, marketing info, reviews/quotes, and images cannot be exported to an Excel or text file. For these attributes you can create a PDF
When you are done, click the Save button.
Then, you can click on Custom Exports to add other new formats.
At this point, your format becomes an option when you export titles to a file. More details on this here
You can create as many of these Custom Export templates as you need, and can always come back and modify or delete your formats as you need.
When you’re viewing the list view of a group of titles, either from within a catalog, a tag grouping, or search results, you may also select the titles you want to download and then choose Export from the Action menu at the top of the list view to download those titles and order quantities using a custom export.
Side note about comma delimited files: Comma-separated files will have quotes around the text fields like title and author. This is standard practice so that normal commas within these fields are not mistaken for delimiters, but the quotes will be removed as you import into another program.
Also, comma delimited files will be exported with a default filename extension of “.CSV” for “comma-separated values” which is a shortcut way for programs importing a file to know that it is comma-delimited. Excel will tend to automatically open CSV files even though they are not technically Excel files. If you do open a CSV file with Excel, you will notice that the EAN will look goofy – because it looks like just a very long number Excel converts it to scientific notation. To convert it into a readable EAN, select the column, right-click, and select ‘format cells.’ Then choose to format as a ‘number’ with 0 decimal places.